Google Cloud Platform
- Google App Engine - Host your applications
- Google Compute Engine - Host your Virtual Machines
- Google Cloud Storage - Host your files
- Google Cloud SQL - Host your databases
- Google BigQuery - Analyze data
- New! Cloud Datastore
- Details at cloud.google.com

Google App Engine
- A web application platform
- Create applications in Java, Python, Go or PHP
- Store data in the cloud
- A set of APIs, including
- Data Storage
- Task Queues
- Users
- Easy to
- Build and Deploy
- Manage
- Scale
- Great for startups: start free and scale as you need it
- Details at developers.google.com/appengine
Developing with App Engine
Step 1: Get the Google App Engine SDK
- Provides libraries for APIs and utilities for deploying
Step 2: Write code
- Handling requests
- Managing data
Step 3: Test locally
Step 4: Deploy to App Engine
Always remember: developers.google.com/appengine
Using Eclipse for App Engine projects
First
- Install Eclipse for Java
- Install the Google Plugin for Eclipse (App Engine SDK Plugin)
- Details at https://developers.google.com/appengine (Getting Started)
Then
- Develop your web application
- Run and test locally
- Deploy to App Engine
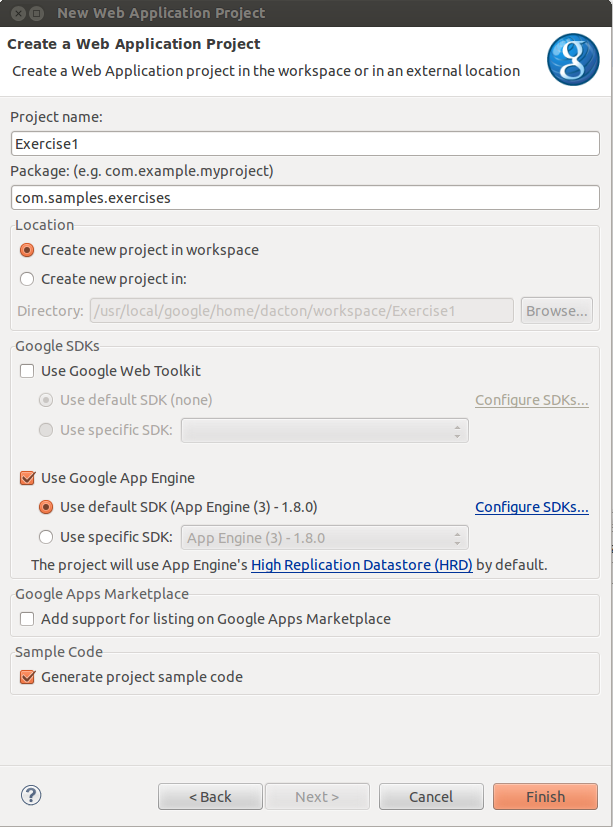
Exercise 1: Hello World
- Open Eclipse
- Click File -> New -> Other -> Google -> Web Application Project
- Provide a name, package and select "Generate project sample code"
- Click Finish
- Right-click your project -> Run As -> Web Application
- Visit http://localhost:8888/ in your web browser
Exercise 1: Hello World
Anatomy of a (Java) web application
- Project Root
-
src/- Source code goes here
war/- Static files go here
index.htmlstyle/js/
WEB-INF/web.xml- Servlet configurationappengine-web.xml- App Engine configuration
Handling requests
Step 1: make sure your web.xml is updated
<welcome-file-list>
  <welcome-file>index.html</welcome-file>
</welcome-file-list>
Step 2: Define your servlet(s)
<servlet>
  <servlet-name>Exercise2</servlet-name>
  <servlet-class>com.samples.exercises.Exercise2Servlet</servlet-class>
</servlet>
Handling requests
Step 3: Map your servlet to a url
<servlet-mapping>
  <servlet-name>Exercise2</servlet-name>
  <url-pattern>/exercise2</url-pattern>
</servlet-mapping>
Step 4: Write servlet code
public class Exercise2Servlet extends HttpServlet {
  public void doGet(HttpServletRequest req, HttpServletResponse resp)
      throws IOException {
    resp.setContentType("text/html");
    resp.getWriter().println("<p>This is another servlet</p>");
  }
}
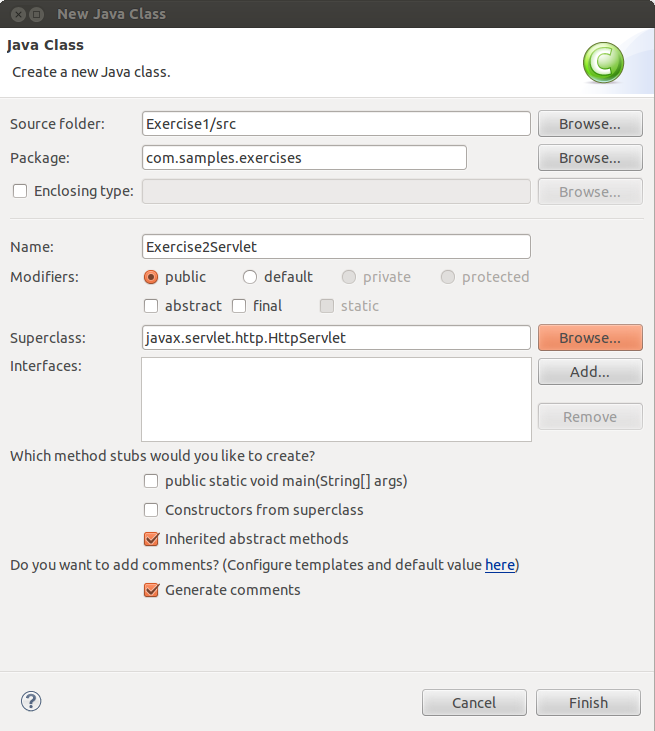
Exercise 2: Adding a servlet
- Right-click your project -> New -> Class
- Provide a package name and class name
- Superclass is
javax.servlet.http.HttpServlet - Create
doGet(...)method (ordoPost, etc.) - Add servlet to
web.xml - Map servlet to
/exercise2inweb.xml - Run your web application
- Visit http://localhost:8888/exercise2 in your web browser
Exercise 2: Adding a servlet
Storing data with Datastore: Entities
- Schemaless NoSQL database
- Object/Entity persistence
- Entity has kind, identifier and optional ancestor path
DatastoreService datastore = DatastoreServiceFactory.getDatastoreService();
// Kind is Person, Identifier is danacton
Entity dan = new Entity("Person", "danacton");
dan.setProperty("name", "Dan");
dan.setProperty("hairColour", "brown");
datastore.put(dan);

Entity danChild = new Entity("Person", "danchild1", dan.getKey());
danChild.setProperty("name", "Dan Child");
danChild.setProperty("hairColour", "brown");
datastore.put(danChild);
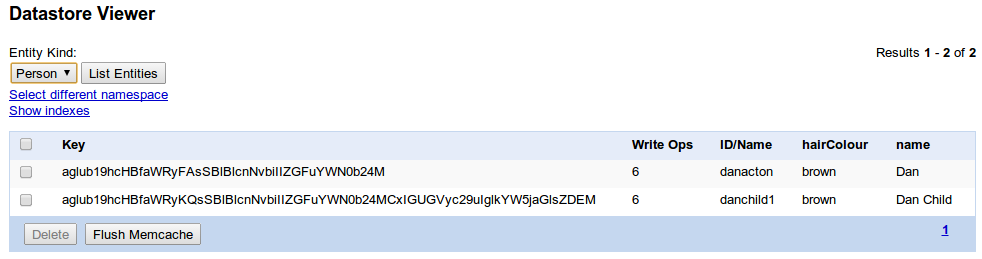
Using the Datastore viewer
Visit http://localhost:8888/_ah/admin
Modifying data in datastore
Update
Entity dan = datastore.get(KeyFactory.stringToKey(...));
dan.setProperty("name", "Daniel");
datastore.put(dan);
// key from datastore viewer for now
Delete
datastore.delete(KeyFactory.stringToKey(...));
// key from datastore viewer for now
Querying data in datastore
Filter nameFilter = new FilterPredicate("hairColour", FilterOperator.EQUAL, "brown");
Query q = new Query("Person").setFilter(nameFilter);
resp.setContentType("text/html");

PreparedQuery pq = datastore.prepare(q);
for (Entity result : pq.asIterable()) {
  String name = (String) result.getProperty("name");
  resp.getWriter().println("Person <b>" + name + "</b> has brown hair<br/>");
}
Exercise 3: Datastore CRUD
- Create 4 new servlets
- CreateServlet - servlet path /create
- ListServlet - servlet path /list
- UpdateServlet - servlet path /update
- DeleteServlet - servlet path /delete
- 1. Create 2 entities of type Person
- 2. List the entities
- 3. Note the keys (can use Datastore viewer)
- 4. Update 1 of the entities
- 5. Delete 1 of the entities
Storing data with Datastore: JDO
- Java Data Objects
- Create POJOs with annotations
@PersistenceCapable
public class Person {
  @PrimaryKey
  @Persistent(valueStrategy = IdGeneratorStrategy.IDENTITY)
  private Long id;

  @Persistent
  private String name;

  @Persistent
  private String hairColour;

  public Person() {}

  // Getters and setters
}
The PerstistenceManagerFactory class
- Singleton class that manages your JDO datastore access
- See
src/META-INF/jdoconfig.xmlfor configuration
package com.samples.exercises.dataobjects;

import javax.jdo.JDOHelper;
import javax.jdo.PersistenceManagerFactory;

public final class PMF {
  private static final PersistenceManagerFactory pmfInstance =
      JDOHelper.getPersistenceManagerFactory("transactions-optional");

  private PMF() {}

  public static PersistenceManagerFactory get() {
    return pmfInstance;
  }

}
Creating data with Datastore: JDO
PersistenceManager pm = PMF.get().getPersistenceManager();

Person dan = new Person();
dan.setName("Dan");
dan.setHairColour("brown");

Person danChild = new Person();
danChild.setName("Dan Child");
danChild.setHairColour("brown");

try {
  pm.makePersistent(dan);
  pm.makePersistent(danChild);
} finally {
  pm.close();
}
Modifying data in datastore
Update
PersistenceManager pm = PMF.get().getPersistenceManager();
Person dan = pm.getObjectById(Person.class, ...);
dan.setName("Daniel");
pm.makePersistent(dan);
// id from datastore viewer for now
Delete
PersistenceManager pm = PMF.get().getPersistenceManager();
Person dan = pm.getObjectById(Person.class, ...);
pm.deletePersistent(dan);
// id from datastore viewer for now
Querying data in datastore
PersistenceManager pm = PMF.get().getPersistenceManager();
Query q = pm.newQuery(Person.class, "hairColour == 'brown' order by name desc");

resp.setContentType("text/html");
List<Person> results = (List<Person>) q.execute();
for (Person p : results) {
  String name = p.getName();
  resp.getWriter().println("Person <b>" + name + "</b> has brown hair<br/>");
}
Exercise 4: Datastore JDO CRUD
- Update the 4 servlets from Exercise 3 to use JDO
- You'll need a class and a PMF
- 1. Create 2 entities of type Person
- 2. List the entities
- 3. Note the keys (can use Datastore viewer)
- 4. Update 1 of the entities
- 5. Delete 1 of the entities
Java Servlet Pages: JSP
- Dynamic server-side coding of HTML pages
- An HTML page with Java code in it
- Whereas a servlet is Java code that prints some HTML
- Presentation layer for your data
- Extension .jsp
- In the
wardirectory
Java Servlet Pages: JSP
Start by denoting this is a JSP page
<%@page language="java" contentType="text/html; charset=UTF-8"
            pageEncoding="UTF-8"%>
Import required classes
<%@page import="java.util.Date" %>
Add Java code to your JSP pages
<b><% out.println(new Date()); %></b>
A simple example
<%@page language="java" contentType="text/html; charset=UTF-8"
           pageEncoding="UTF-8"%>
<%@page import="java.util.Date" %>

<!DOCTYPE html>
<html>
  <head>
    <title>A simple example</title>
  </head>
  <body>
    <p>
      The date is: <b><% out.println(new Date()); %></b>
    </p>
  </body>
</html>
Passing parameters
Before, we hard-coded keys. Now, we pass them around.
Using HTTP GET
http://localhost:8888/update?id=4
Using HTTP POST with a form
<form action="/update" method="POST">
  <input type="hidden" name="id" value="4">
</form>
Passing parameters
In your code
<%
  String val = "nothing";
  if (request.getParameter("id") != null) {
    val = request.getParameter("id");
  }
%>
The id you passed is <b><%=val%></b>
Exercise 5: Your first App Engine web app
- Create a web app that manages people
- These operations are required
- Create a Person
- Update a Person
- Delete a Person
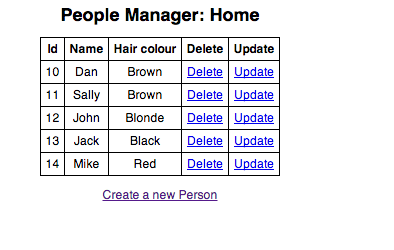
Exercise 5: Hints
- Use servlets to do the work (e.g. deleting a Person)
- Use JSP for presentation/data capture (e.g. showing all Person objects)
- Servlets: create, delete, update
- JSPs: home, update entry, create entry
Useful links
<Thank You!>